
Donut Wall DIY and Styling Inspiration
Donuts at a wedding? We can’t think of anything sweeter! We’ve put together a simple, donut wall DIY that you can complete in less than two hours.
May 20, 2018
Creating a delectable donut wall for your wedding doesn’t have to be a difficult task. We’ve put together a simple, six-step DIY donut wall tutorial that you can complete in less than two hours. So, update your wedding hashtag and get your snap filter ready, because you are just one quick trip to the hardware store (and the donut shop) away from giving your guests a sweet surprise.
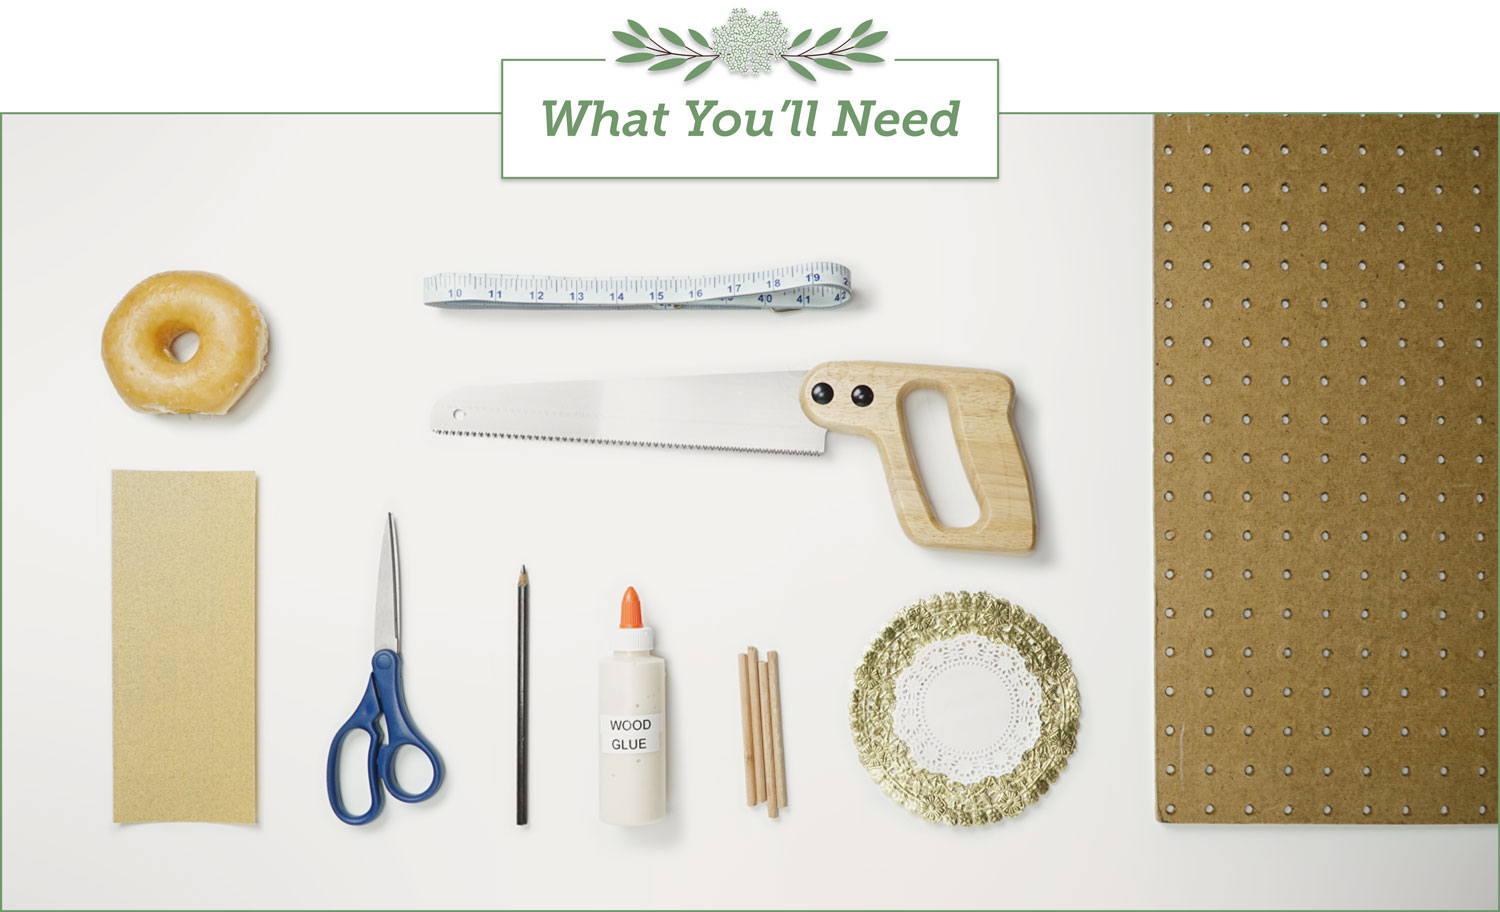
Things you’ll need:
- 25” x 37” pegboard
- Two ¼” x 36” wood dowels
- 12 - 6” gold paper doilies
- 12 - 4” white paper doilies
- Two dozen donuts
- Ruler or measuring tape
- Scissors
- Pencil
- Medium sandpaper
- Handsaw
- Wood glue
Optional:
- Birch plywood (instead of pegboard)
- Drill and bits
- Paint in your favorite color
- Paint roller
- 8” x 10” chalkboard
- Fine tip chalk pen
Tips:
- If you don’t have the tools you need, some hardware stores will let you rent them!
- Be aware that not all pegboards and dowels are interchangeable. Most are either 1/4” or 1/8.” Either one will work for your wall - just make sure your dowels and pegboard are the same sizes.
- If you prefer the look of a solid board over pegboard, you can opt for plywood as your background material. For this option, you’ll need to measure out where you want the holes (like step four below) and create them with a drill and bits that are the same diameter as your dowels.
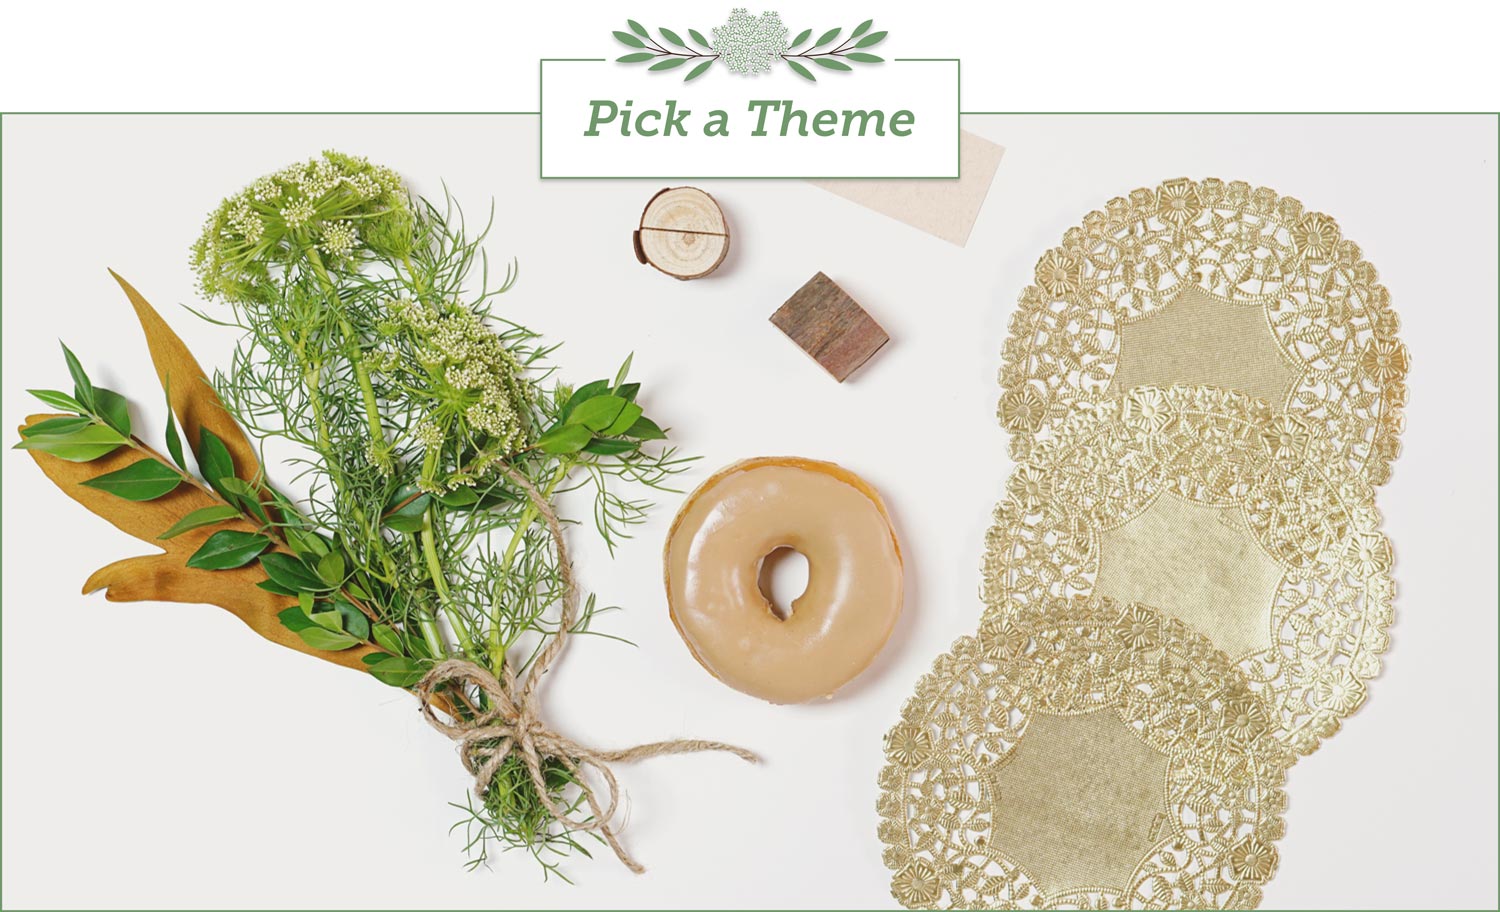
Before you begin, think about what kind of look and feel you’d like your wall to have. Keep in mind the color scheme and theme of your wedding for a look that flows seamlessly into the decor. Or, consider a statement piece that is made to stand out and would be the perfect backdrop for photos.
We decided to create a rustic, woodsy-inspired donut wall with natural hues, complemented by a dessert table in green and gold. We’ve included some more styling inspiration at the bottom of this post.
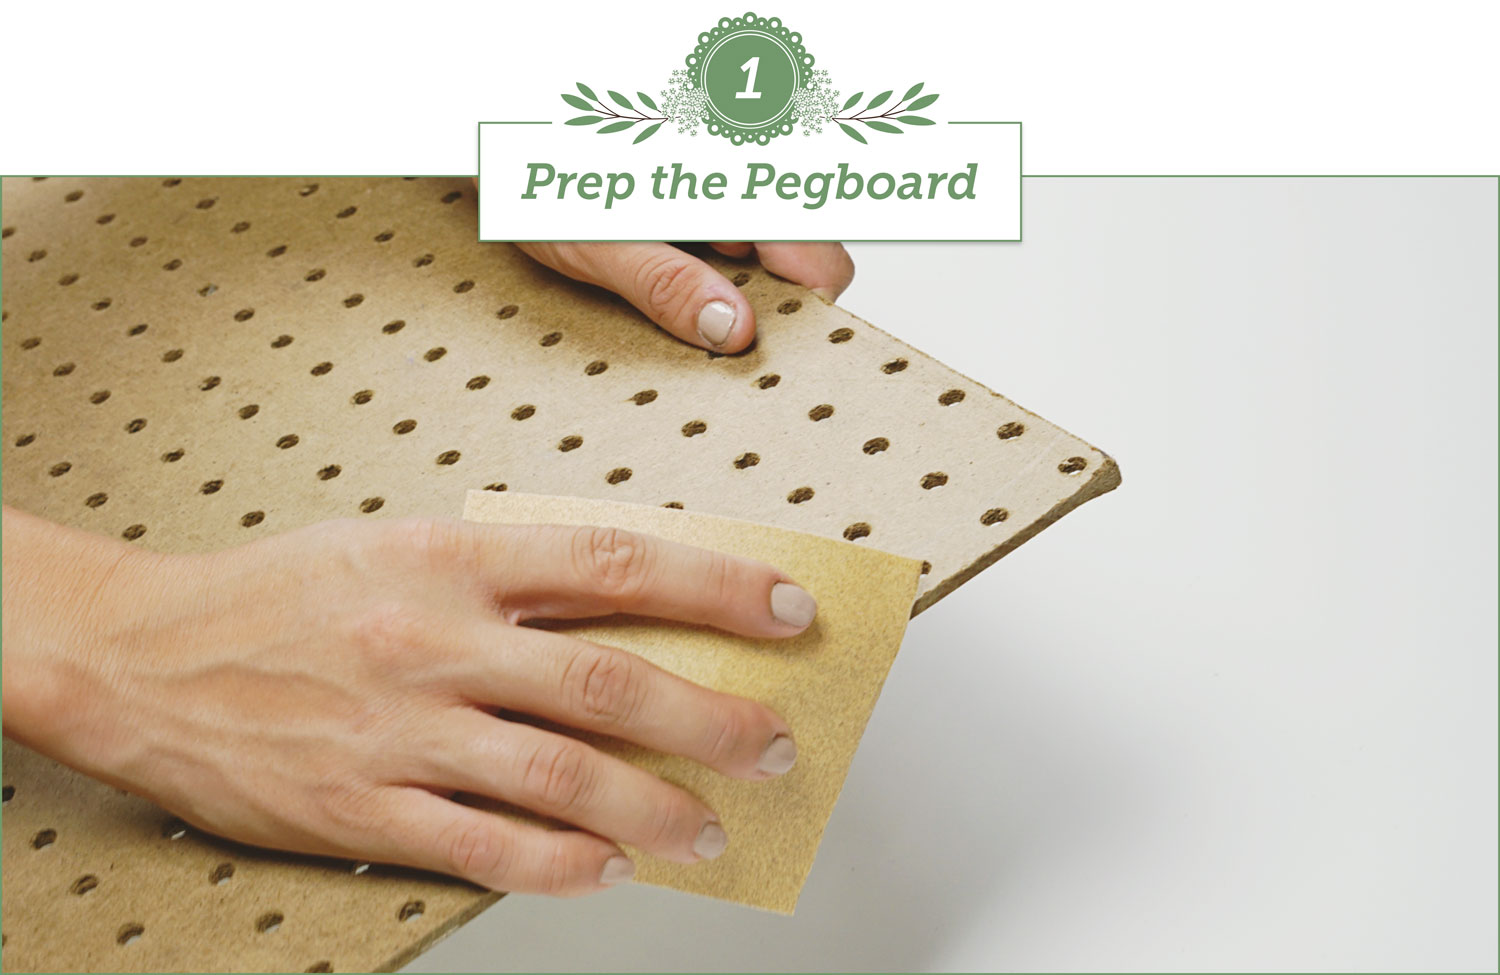
Step one: gather your supplies and prep the pegboard
Once you’ve chosen your color and theme, you can buy your supplies and paint colors (optional) to customize your backdrop. We liked the unfinished look of the brown backing on our white pegboard, so we chose to turn it around and leave it bare.
Gently run a piece of sandpaper over the corners and holes to get rid of any rough edges. Clean the excess dust off of the board with a clean, damp cloth, then let it dry.
If you have decided to paint your donut wall to match your wedding decor, use a small paint roller for an even application. For lighter colors, you may need to do two layers and allow for drying time in between.
Tips:
- Ask the hardware store to cut your pegboard or plywood to your desired dimensions when you buy it. Most stores will do this at no cost.
- Put out a protective sheet or paper to keep your floor free of any dust or paint - it will drip through the holes!

Step two: cut the wood dowels
Starting at the edge of each dowel, measure in 3 inches and 4 inches and make a mark at each.
Using the hand saw, carefully cut at the 4-inch mark, sanding the edges when you are done. Use a clamp or hold the dowels down over the edge of a table. This allows you to cut more than one at a time.
Tips:
- You can skip this step by buying pre-cut dowels if they are available at your hardware (or craft) store. Simply make a mark 3 inches in from the edge of each one.
- Use longer dowels if you’d like to stack more than one donut on each one. The benefit to doing this is that you don’t have to worry about restocking your wall throughout the night. We’d recommend adding two to three inches in length on your dowel for every donut you want to stack. Don’t stack more than three or four donuts per dowel - they might fall out of place!
- If you painted your wall, you can purchase pre-painted dowels in a variety of colors (basic hues are easier to find online and in hardware stores). Look for non-toxic paints and finishes because these will be in direct contact with your sweets.
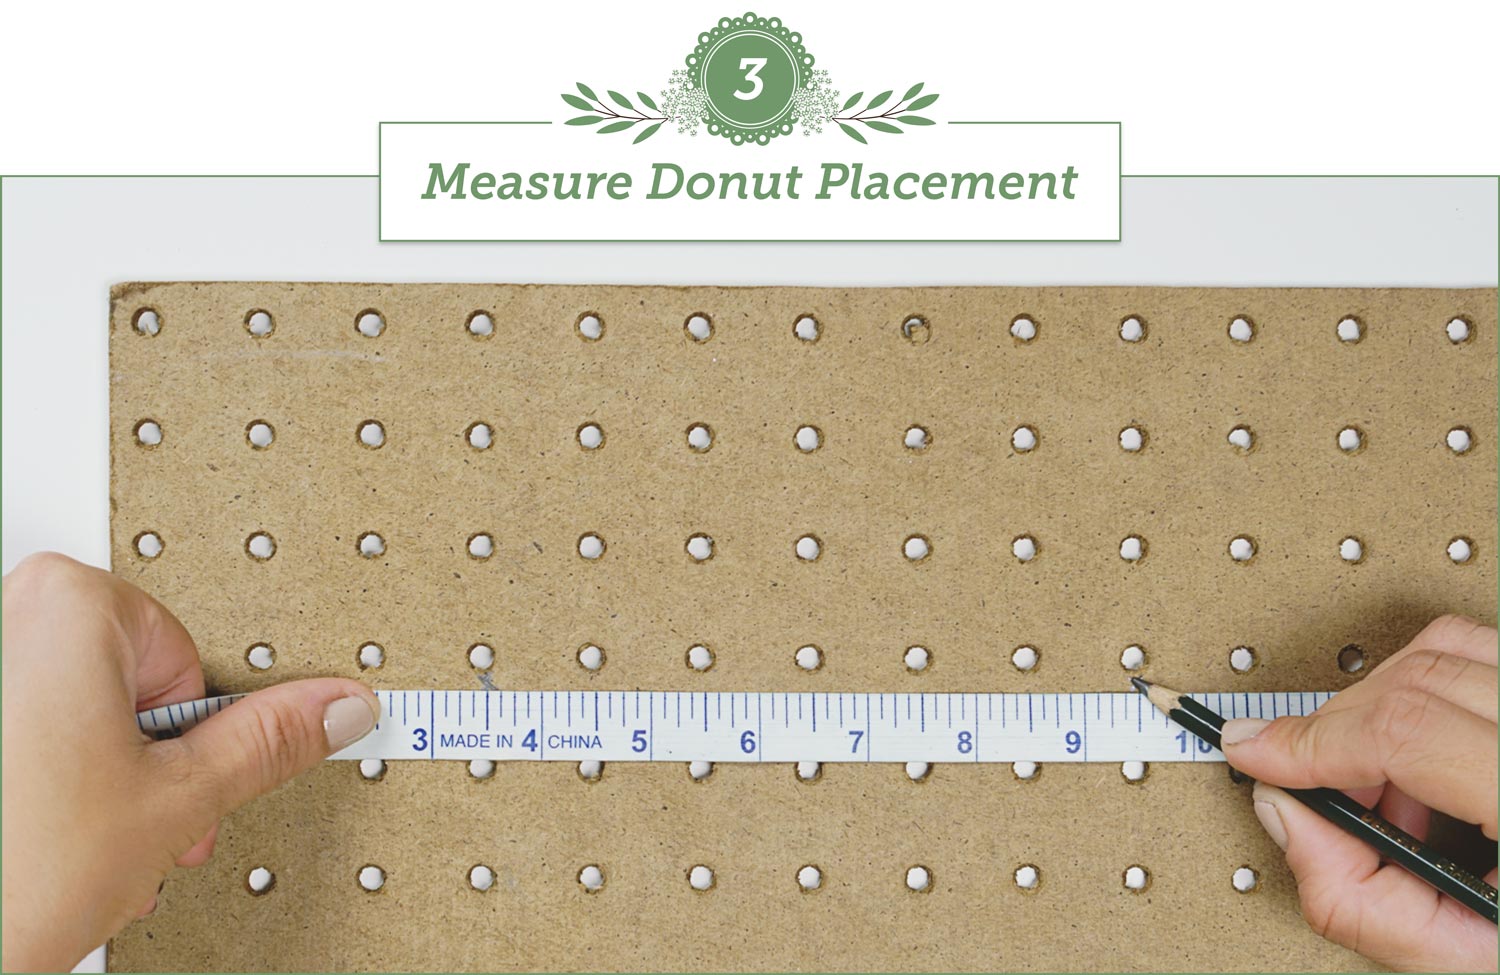
Step three: measure your donut placement
Starting in one corner of the pegboard, use your ruler to measure 3.5 inches down from the top edge and 3.5 inches in from the side. Make a mark at the hole where these two points meet.
From that initial mark, lay your ruler horizontal across the board and make a mark every 6 inches across. This will be your first row.
Make your second row by measuring 6 inches down from the initial mark and then making a mark every 6 inches across. Repeat until you have 24 marks total. Each mark that you create should be near a hole – that is how you will know where to place a dowel and hang the donuts.
Tip:
- If you want more or less space between your donuts (or want to spell out a word), cut out 6-inch paper circles and use them to plan your donut spacing.
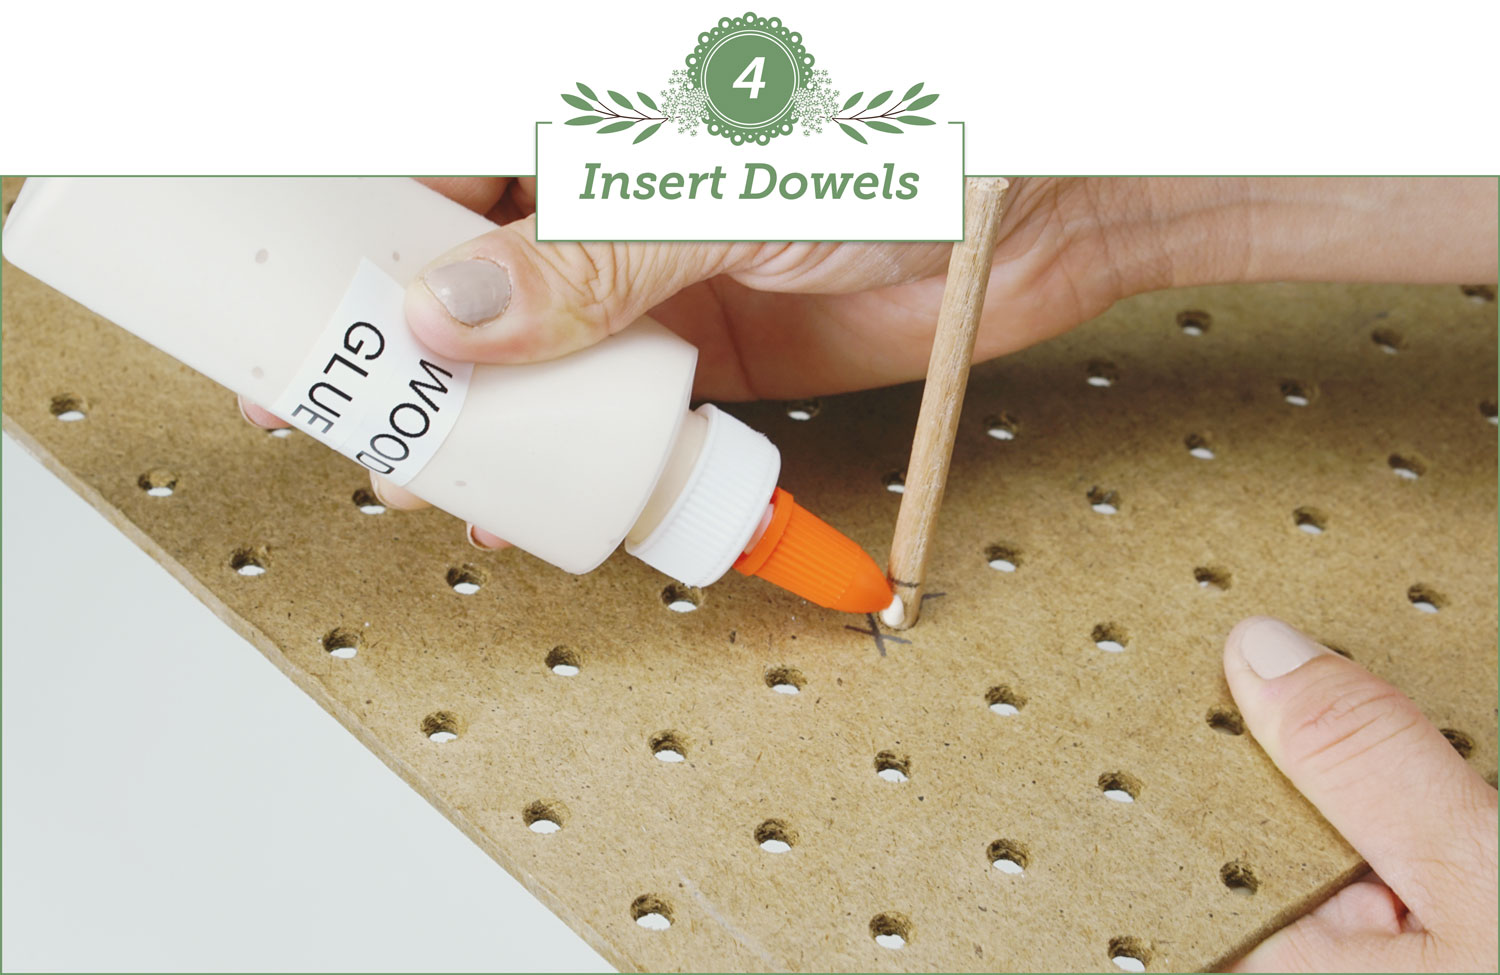
Step four: insert the dowels
Holding your pegboard so that it’s not flat against the floor or a wall, put a small amount of glue on each dowel where you made a mark. Then, put one in each hole you measured out in step four, pushing it about an inch through the board in order to create stability for the dowel to hold a donut. Add a little extra wood glue, if needed.
Continue to do this until all of the dowels are in place. Carefully lean the board against a wall for a few hours to dry.
Tips:
- To make it easier to push in the dowels, twist them back and forth as you put them in place.
- If you want more or less space between your donuts (or want to spell out a word), cut out paper circles and use them to plan your donut spacing.
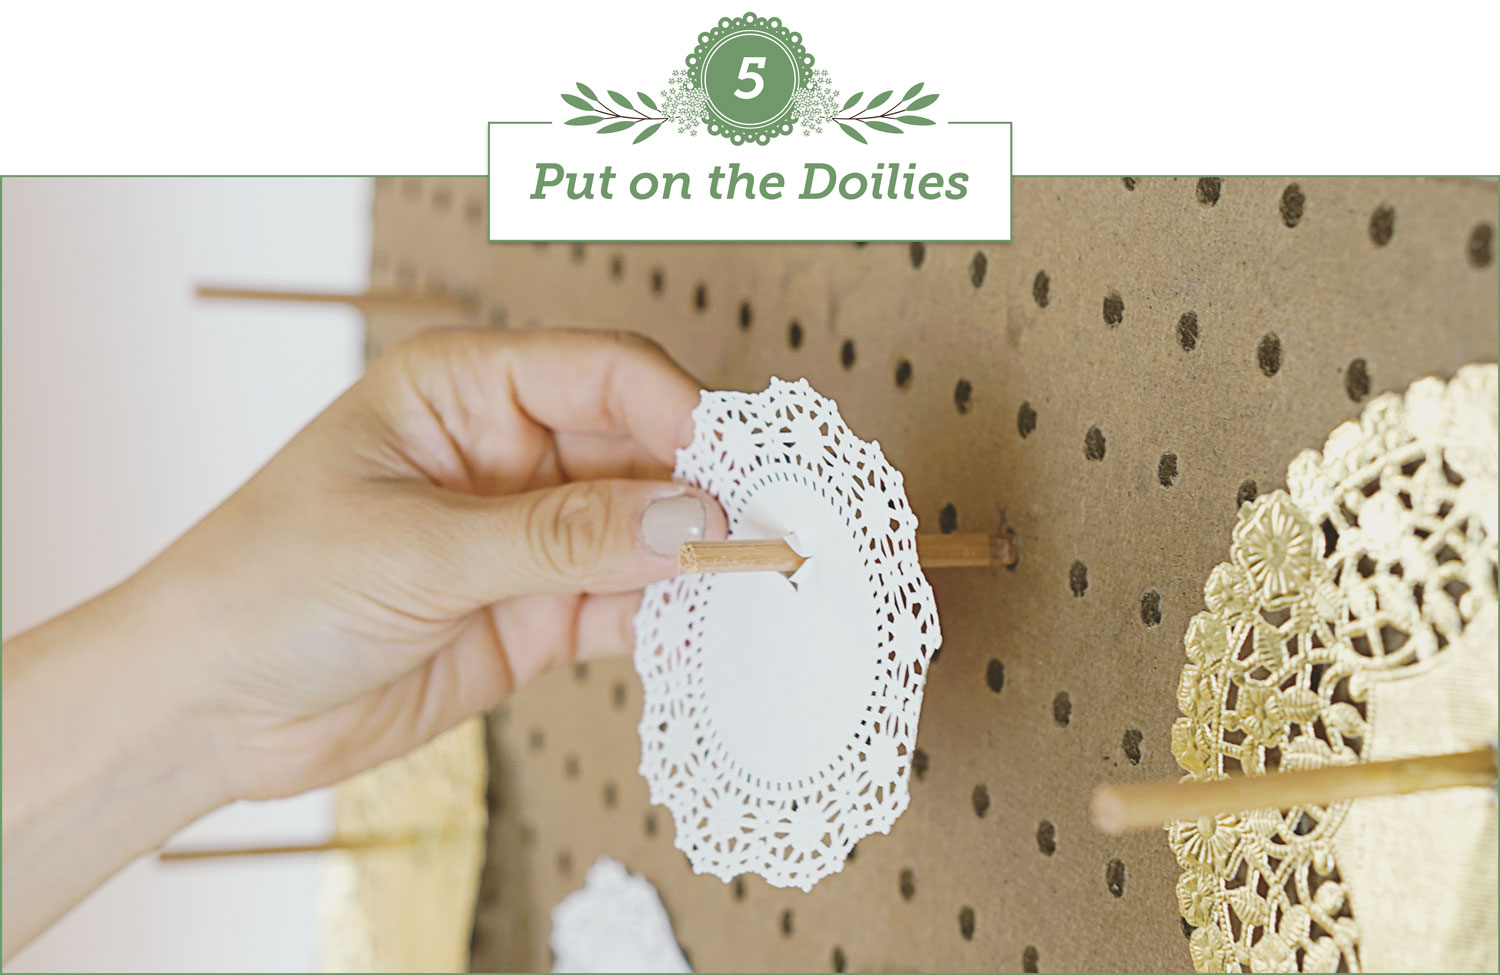
Step five: put the doilies in place
To keep the donuts extra clean, we added doilies! They peek out behind the donuts and keep them clean while adding a nice little touch of white and gold to the rustic look we wanted to create.
To place them over the dowels, you will need to cut a small “X” (less than 1 inch across) in them. Find the middle of each doily and measure up about half an inch. Make your cut at that point. This will mean that your "X" is a little off center but will ensure that your doilies are centered behind the donuts.
Push the dowels through the “X” and secure with a little wood glue.
Tips:
- Use your ruler to find the middle of each doily ‒ or do what we did and put a gentle fold in it!
- To avoid bending or folding the doilies in order to cut them, use a craft knife on a protected surface.
- You can purchase bigger or smaller doilies depending on how big your donuts are and if you want them to show.

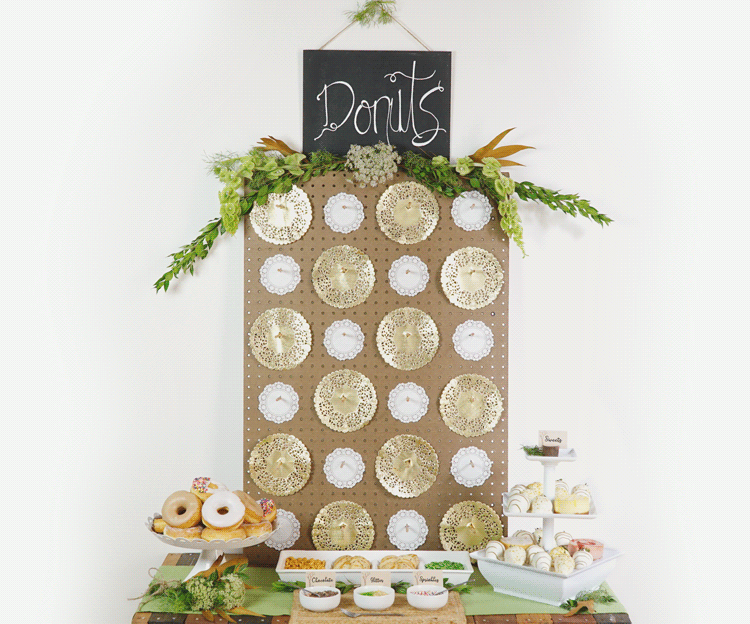
Step six: add your decor and hang the donuts
We recommend decorating your wall and hanging the optional chalkboard sign before you put your donuts on the wall. That way, nothing will fall on your tasty treats and you can easily move the board around if you need to.
To add a chalkboard sign, choose a quote or word that you like and write it with a chalk pen. Center and hang the board above your donut wall. Hang any other decor or details around it.
All that’s left is to hang your donuts! You can organize your sweets by row, column, diagonals or in any pattern that you decide. Have fun with it!
Your donut wall may be the star of the show, but we have some additional ideas for adding and setting up a dessert table that will satiate every sweet tooth:
- Set extra donuts on a tiered cake dish so guests don’t have to remove donuts from your wall until everyone has had a chance to take a photo of it! We added a dozen in assorted flavors and glazes.
- Don’t forget to include other sweets like cheesecake, dipped strawberries, cookies and fun toppings for the desserts.
- Provide take-home bags with the initials of the bride and groom instead of goodie bags at each table.
- Customize your donuts by offering different flavors or DIYing your own glaze - like this delicious apricot one we found on Bespoke Bride.
- For health-conscious couples and guests, choose vegan and gluten free donuts to feature.
- Add a sprinkle of glitter finish off the look! Here’s a recipe we made on how to make glitter you can eat.
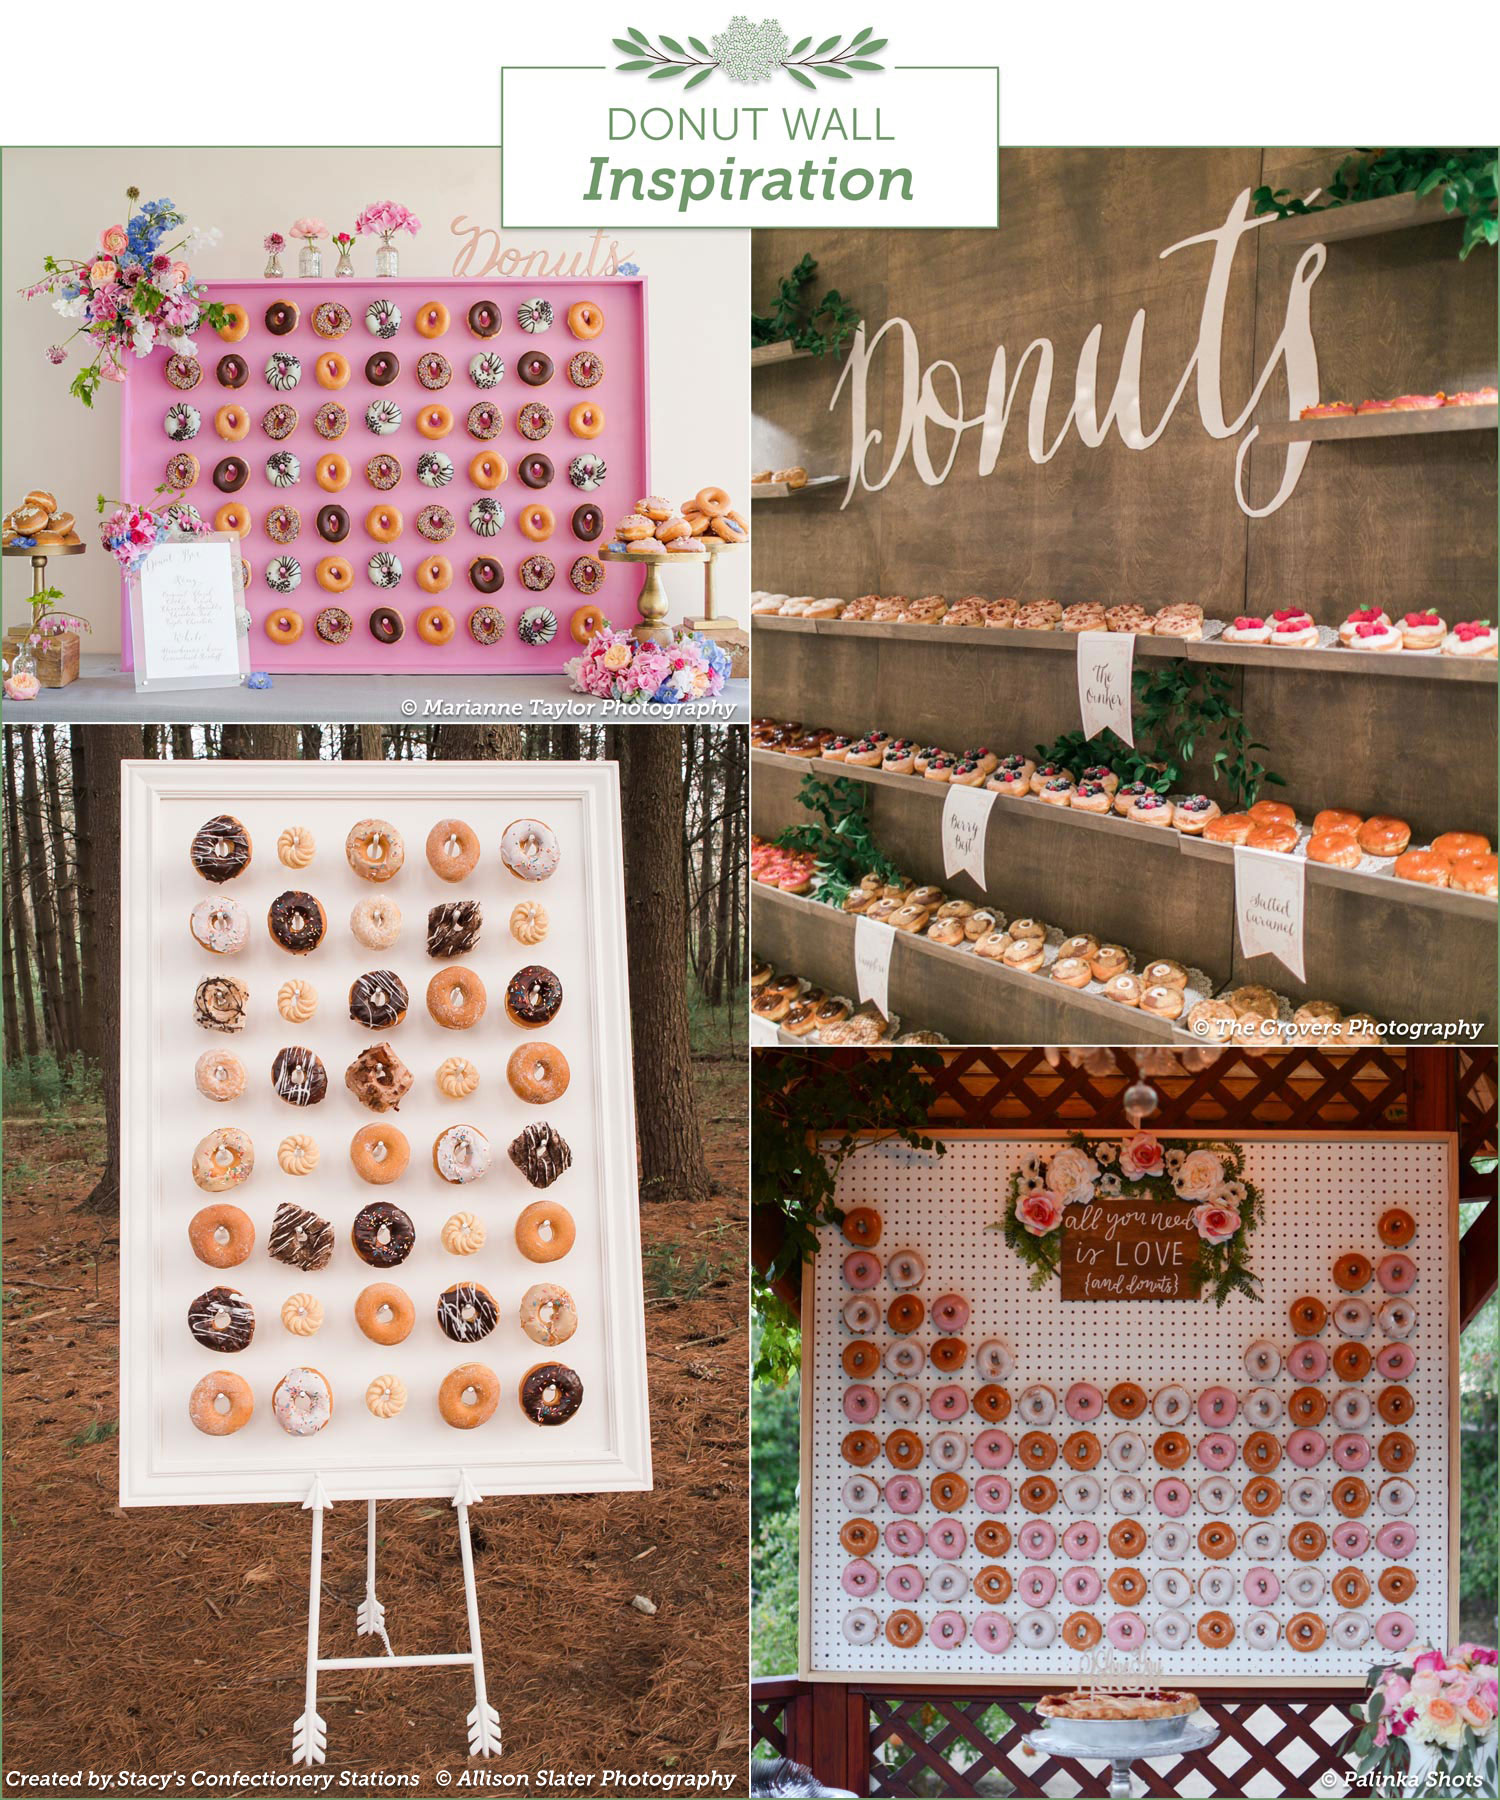
If you still need design inspiration for creating a donut wall that will wow your wedding guests, we’ve rounded up some of our favorite ideas here:
Rustic: Who doesn’t love a classic glazed donut? For this idea, stick to traditional icing flavors - like maple, vanilla, chocolate and cinnamon. This will create a rustic look that pairs perfectly with a neutral wedding pallet or outdoor reception. Add live foliage accents to bring in the woodsy element that we created.
Pastel and Ethereal: Pastel icing colors and a white background create a soft, romantic setting that is as sweet to look at as it is to taste. Put the finishing touches on it with a vintage, boho-chic picture frame around the pegboard.
Love Notes: Share your love of sugar and your love for each other on your big day by spelling out something sweet with the donuts or a sign! It works best to do this theme on plywood, so that you can drill holes exactly where you want the letters. Stick to simple words like “LOVE,” “I DO” or the initials of the bride and groom to be. Keep a tiered donut platter nearby so guests don’t have to take treats from the wall, which might change the words on display!
Fun and Bright: Donuts look perfect dressed in pink. Have fun with your donut wall design and give guests a great photo op by choosing mixed colors, sprinkles and even custom neon icing. You can personalize your desserts by ordering custom flavors and icings that are chosen by the bride and groom themselves.
Photos courtesy of (clockwise from top left): Marianne Taylor Photography, The Grovers Photography, Palinka Shots and Allison Slater Photography. The bottom left design was created by Stacy's Confectionery Stations.
DIY Donut Wall Tutorial
Ready to make a donut wall for your upcoming event? Download this visual for a complete supply list, step-by-step instructions and styling tips for a beautiful creation.


